Clinical Application: Selection And Key Techniques In Meniscus Repair
Apr 15, 2026
Clinical Application: Selection and Key Techniques in Meniscus Repair
Once a meniscus tear is deemed "repairable," the clinician faces the next critical question: How should it be repaired?
From the classic "inside-out" technique to modern "all-inside" systems, each method has specific indications and technical nuances. Clinical application of meniscus repair is an art of balancing anatomical constraints, biological requirements, and biomechanical demands.
Three-Dimensional Decision Framework for Technique Selection
Dimension 1: Tear Location Dictates Approach
Anterior Horn Tears
Anatomical features: Good visibility and working space, but proximity to the infrapatellar fat pad can cause interference.
Preferred technique: All-inside repair.
Portal combination: Standard anteromedial + anterolateral portals.
Key points: Avoid fat pad injury; partial resection possible if necessary.
Suture orientation: Perpendicular to tear; avoid parallelism with patellar tendon.
Body Segment Tears
Anatomical features: Good visibility, but posterior aspect is near popliteal neurovascular structures.
Technique options: All-inside or inside-out repair.
Approach adjustment: Height of portal adjusted according to tear location (anterior vs. posterior).
Safety margins: Medial body ≥15–20 mm from popliteal structures; lateral body ≥8–12 mm.
Posterior Horn Tears (Most Challenging)
Anatomical features: Limited visibility, narrow workspace, adjacent to critical neurovascular structures.
Medial posterior horn: Prefer inside-out (better visualization and control).
Lateral posterior horn: Prefer all-inside (avoid common peroneal nerve injury).
Accessory portals: Posteromedial or posterolateral for direct access.
Safety technique: Knee flexed at 90°, hip externally rotated (medial) or internally rotated (lateral).
Dimension 2: Tear Pattern Determines Suture Configuration
Vertical Longitudinal Tears
Ideal suture: Vertical mattress suture.
Spacing: 4–5 mm between sutures.
Margin: 3–4 mm from tear edge.
Biomechanics: Restores hoop stress; optimal tensile strength.
Technique: Needle entry perpendicular to tear plane, depth ≈80% of meniscal thickness.
Radial Tears
Suture pattern: Horizontal mattress or "T-suture."
Consideration: Full-thickness radial tears require restoration of circumferential continuity.
Variation: Combine with vertical sutures for peripheral stability.
Rehabilitation: Protected rehab due to lower initial strength.
Root Tears
Suture technique: Transtibial pullout or suture anchor fixation.
Key point: Anatomical footprint reconstruction within ≤2 mm of original insertion.
Tension control: 20–30 N to avoid meniscal extrusion.
Adjunct: High tibial osteotomy if alignment correction needed.
Dimension 3: Patient Factors Influence Technique Choice
Young Athletes
Technique: Inside-out (maximum strength).
Suture: Non-absorbable high-strength (2-0 UHMWPE).
Augmentation: Consider double-row or reinforced sutures.
Rehabilitation: Aggressive but progressive protocol.
Middle-Aged Active Patients
Technique: All-inside repair (minimally invasive, faster recovery).
Biological augmentation: PRP or fibrin clot.
Rehabilitation: Standard protocol; return to sport at 6–9 months.
Special Cases (Revision, Poor Tissue Quality)
Technique: All-inside + biological augmentation.
Suture density: Increase to every 1–1.5 cm.
Rehabilitation: Extended protection phase with close monitoring.
Essentials of the Operative Process
Preoperative Planning
Detailed MRI analysis: location, length, stability, tissue quality.
Instrument preparation: appropriate guide curvature and needle type.
Anesthesia: spinal or general for full muscle relaxation.
Positioning: Supine with affected limb free to drape and manipulate.
Diagnostic Arthroscopy
Systematic inspection of all six compartments.
Tear assessment: probe stability, measure length/rim width, evaluate tissue quality (color, elasticity, bleeding).
Finalize decision on feasibility and technique.
Preparation for Repair
Synovial debridement: 4.0 mm shaver around tear edges (2–3 mm).
Freshening tear edges: meniscal rasp to create bleeding bed (uniform punctate bleeding).
Biological augmentation (optional): PRP injection or fibrin clot placement in tear gap.
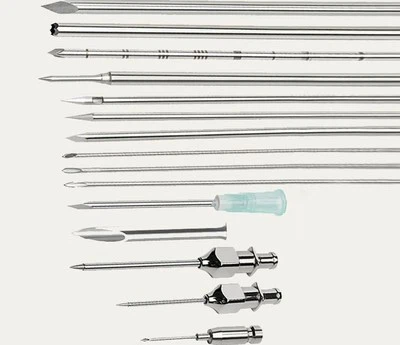
Suturing Techniques
Inside-Out Technique (Gold Standard for Posterior Horn)
Guide placement: 25–30° curvature, perpendicular to tear, 3–4 mm from edge.
Needle passage: parallel to tibial plateau, depth just through opposite synovium.
Suture passage: steady speed, secure with passer.
Protective incision: 2–3 cm posterior to joint line; blunt dissection; use retractor to protect neurovascular bundle.
Knot tying: sliding-locking knot (e.g., Tennessee knot), tension 20–30 N, finish with ≥3 alternating half-hitches.
All-Inside Repair (Preferred for Body and Anterior Horn)
Device prep: correct size, preloaded suture tested for mobility.
Guide positioning: perpendicular to tear via standard or accessory portal.
Device insertion: depth per manufacturer limits; confirm anchor deployment visually/fluoroscopically.
Tensioning: gradual, observe meniscal reduction.
Knot tying and trimming: low-profile cuts to avoid cartilage abrasion.
Special Situations
Bucket-Handle Tears
Reduce displaced fragment with probe.
Temporary fixation with 1–2 stay sutures.
Sequential suturing from posterior to anterior.
Density: every 1–1.5 cm.
Balance tension to avoid puckering.
Complex Tears
Stage repair: address main longitudinal component first.
Horizontal components: compress with horizontal mattress sutures.
Debride degenerate tissue, retain viable tissue.
Routine biological augmentation.
Revision Repair
Identify cause of failure.
Thoroughly debride fibrous scar tissue.
Reinforce with increased suture density + biological augmentation.
Correct instability or malalignment.
Postoperative Evaluation & Rehabilitation
Immediate Intraoperative Check
Probe stability: <1 mm displacement.
Full ROM check: observe tension changes.
Assess ACL integrity.
Document technique, suture count, tension parameters.
Rehabilitation Protocols
Aggressive (Young Athletes, Simple Tears)
Immediate: brace locked at 0°, straight leg raises.
Week 2: partial weight-bearing (30% BW), passive ROM 0–90°.
Week 4: full weight-bearing, closed-chain exercises.
Week 8: open-chain exercises, stationary bike.
Week 12: light jogging.
Month 6: return to training.
Month 9: return to competition.
Standard (Majority of Patients)
Weeks 0–4: brace locked, non-weight-bearing.
Weeks 4–6: partial weight-bearing, ROM 0–90°.
Weeks 6–8: full weight-bearing, closed-chain.
Weeks 8–12: low-impact aerobics.
Months 4–6: resume daily activities.
Months 9–12: return to sport.
Protected (Complex, Revision, Poor Tissue)
Weeks 0–6: brace locked, non-weight-bearing.
Weeks 6–8: begin partial weight-bearing.
Weeks 8–12: full weight-bearing.
Months 4–6: start strengthening.
Months 9–12: low-impact activity.
Months 12–18: gradual return to sport.
Complications: Prevention & Management
Neurovascular Injury
Prevention: protectors for posterior horn repair, mastery of anatomy.
Management: immediate exploration and repair; most nerve injuries recover spontaneously.
Infection
Incidence: <0.1%.
Management: arthroscopic lavage, retain repair sutures; antibiotics based on culture for 4–6 weeks.
Joint Fibrosis
Prevention: early motion, inflammation control.
Management: aggressive rehab, possible arthroscopic release.
Suture-Related Issues
Cutting: reduce activity or revise.
Breakage: rare, evaluate technique/material.
Anchor complications: displacement, loosening, cartilage damage.
Long-Term Follow-Up & Outcome Assessment
Follow-Up Schedule
2 weeks: wound check.
6 weeks: clinical review, advance rehab.
3 months: MRI for early healing.
6 months: functional assessment.
12 months: MRI for healing quality.
Annually: clinical and imaging follow-up.
Outcome Criteria
Clinical healing: asymptomatic, normal function.
Radiographic healing: MRI shows continuity.
Functional recovery: return to pre-injury level.
Joint protection: no radiographic OA progression.
Expected Success Rates
Ideal patients: >90%.
Standard patients: 85–90%.
Borderline cases: 70–80%. - Complex cases: 60–70%.
From Technique to Outcome
Meniscus repair in clinical practice is essentially the process of translating biological potential into tangible results. Appropriate technique selection, precise execution, and individualized rehabilitation are equally essential. Even the most flawless surgical technique cannot succeed without biological healing, patient compliance, and long-term joint protection awareness.
The success of meniscus repair spans not just hours in the operating room, but months of healing, years of functional restoration, and decades of joint preservation. The repair technique is only the starting point. From there, the patient, surgeon, and rehabilitation therapist must walk the rest of the journey together.
Perhaps the deepest lesson of meniscus repair is this: The best technique is the one that creates optimal conditions for biological healing; the best outcome is the perfect synergy of technique and nature.
If you'd like, I can now compile all six sections you've shared into one integrated, journal-ready manuscript with consistent structure, references, and academic tone, ready for submission to a medical journal.
Do you want me to proceed with that unified, polished version next?